November 30, 2009

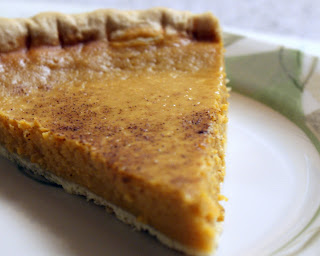
Magic Pumpkin Pie

We are not allowed to celebrate Thanksgiving or Christmas in this house without making this pie. This recipe comes from my husband's side of the family and this year he even made it himself!

I have to admit, the first time I saw this recipe I was pretty skeptical. What kind of pumpkin pie isn't loaded with spices? Dubious, I followed the instructions, but to my surprise I ended up with a pie full of sweet, clean flavors. The cinnamon sprinkle on top is all the spice this pie needs!

Ingredients

1 c pumpkin
1 heaping tsp flour
2 T brown sugar
1 egg, beaten
1 pinch salt
1 pint evaporated milk
1/2 c sugar
dash cinnamon

Mix pumpkin, sugar, brown sugar, egg, and salt. Beat well, add milk. Beat again. Pour into unbaked pie shell and sprinkle cinnamon on top. Cook at 450 for 10 minutes. Reduce heat to 350 and bake for an additional 30-40 minutes.

If you're feeling naughty, you can use a full cup of sugar and sweet milk instead of evaporated milk.

Edit 11/25: So today I was making the famous family Pumpkin Pie recipe and realized we were about a quart short of evaporated milk. Luckily, it turns out that you can substitute dried milk that has been inadequately hydrated for evaporated milk, as all the latter is is milk that has a lower water content than usual.

We'll see how it turns out...

This recipe even made it into the paper! That's my husband there, wasn't he an adorable toddler?

November 28, 2009

A belated "Happy Thanksgiving" and Olive Bread

For Thanksgiving this year I was responsible for bread and one drink.

I went a little overboard.

Basically, I couldn't decide what kind of bread to make, so I made them all! The no-knead bread came out beautifully, the best I've ever made. The crust got that lovely reddish brown color and the insides were full of large bubbles. I thought at first that the dough was too wet, but I guess not! I wasn't entirely pleased with my epi wreath - I cut my epis wrong. I knew I was doing it, too, I just wasn't thinking! Bad me! Finally, I made Stacey's Olive Rosemary bread, half as a boule and half as a braided loaf. As a side note, I reduced the amount of olives just to be different. Actually, I was just tired of chopping things up. But it worked out fine, and I'm not a huge olive fan anyway.

Ingredients

1 3/4 c warm water
2 t instant yeast
2 T honey
3 1/2 c bread flour
1/2 c whole wheat flour
2 t salt
1 T dried rosemary
3 oz pitted olives, rinsed, chopped rough, and patted dry

Blend water, yeast, and honey in a medium bowl. Add the flours and stir until dough forms into a ball. Cover with plastic wrap and rest for 20 minutes.

Make a well in the middle of the dough and add the salt and rosemary. Stir briefly, just until the salt and rosemary are mostly mixed in. Turn out onto a floured counter and knead until the dough becomes smooth and tacky. Then pat the dough into a 12x6 rectangle. Press olives evenly into dough. Roll the rectangle into a log, pinching the seam shut. Seam side up, roll log into a spiral. Transfer the dough to an oiled bowl, spritz the top with spray oil, and cover with plastic wrap. Let dough rise until it increases in size by 50%, about 1 hour.

Fold partially risen dough over itself. Turn bowl 90 degrees; fold again. Turn bowl again; fold once more. Cover and let rise 30 minutes. Repeat folding, replace cover, and let rise until doubled in volume, about 30 minutes.

Transfer dough to counter, being careful not to deflate. Divide dough in half, loosely shape each piece into boule, and let rest 15 minutes. For a braid, divide the dough half into three. Form each third into a boule and rest.

Complete the boule, pinching the seam shut. Or, for a braid, roll each third out to form a strand. If the strand isn't staying stretched, let it rest again. Once you have three equal length strands, carefully braid them together, pinching the ends firmly so that they do not seperate.

Transfer loaves to parchment paper or greased pan. Cover with plastic wrap and let rise until doubled in size, 1 to 1 1/2 hours. Meanwhile, adjust oven rack to lower-middle position and heat oven to 450 degrees at least 30 minutes before baking.

Bake 15 minutes, spraying oven with water twice in first 5 minutes, and then reduce oven temperature to 375 degrees. Continue to bake until bread is deep golden brown and instant-read thermometer inserted into center of loaf registers 210 degrees, 25 to 30 minutes. Transfer to wire rack, discard parchment, and cool loaves to room temperature, about 2 hours.


Garlic-Jalapeno Hummus

I have this thing about beans. For years, I swore up and down that I hated them. I refused to eat them, I abhorred chili that included beans. Then I realized that it wasn't beans that I didn't like - it was the texture. So I began adding pureed beans to several of my recipes (it gives the chili an incredibly silky texture, by the way!).

In a similar vein, I thought hummus was creepy. I'd never been exposed to it as a child, so in college when I saw people just dipping stuff into this tub of brown gunk I said "ew" and never thought more about it. Mind you, I didn't actually have any idea what hummus was - just that it looked gross.

Fast forward to Alaska, and more specifically to Orso. Most restaurants provide you with bread and butter. Orso does not give you butter. They give you something else. Obediently, I spread it on my bread and realized that this stuff tasted good! After a time or two, I realized that it was basically pureed beans and garlic. Okay, I said, that makes sense! It wasn't for several months that someone pointed out to me that this was actually hummus.

Revelation!

This became our pre- and post-Thanksgiving snack. Pre-Thanksgiving because you are hungry, but don't want to fill up before dinner, so a slice of bread with hummus does the trick! Post-Thanksgiving because my husband went back for fourths and was incapable of eating anything more than this for two days!

Ingredients
1 can chickpeas (garbanzo beans), drained
4 slices jalapeno
2 cloves garlic
1 T olive oil
1 T lemon juice
water

Combine first five ingredients in a food processor. Pulse until blended together. Add water to adjust to desired texture.

November 19, 2009

Easy Rosemary Bread - Epi Wreath

Next week is Thanksgiving. While we are not hosting this year, we did volunteer to bring some assorted breads and pumpkin pie, and I'll probably be bringing some potatoes as well. Earlier this week I was talking to Stacey about just which bread I should make. While I still haven't answered that question, I did decide during the conversation that I wanted to try a wreath shape. Stacey recommended a test run, so I worked one into my very tight bread-making schedule with this recipe from At the Very Yeast. The author billed it as cheap, easy, and quick - just what I needed for testing out new shapes! Quick it is, for I took this out of the oven less than three hours after I started the dough. That's quick enough to make after work!

The dough seemed dry at first, but it turned out smooth and not at all sticky, which is a nice change from the sticky things I've been working with during the BBA challenge lately. It wasn't quite as smooth as I would have liked, though. I got it close to the windowpane test, formed it into a boule, and set it to rise.

After the first rise, it was shaping time. To make the wreath, I gently worked my fingers through the center of the boule and began to slowly stretch the dough into a ring. I let it rest for about 10 minutes then stretched it again, smoothing it out. After a second rise made the epi cuts. It worked out fairly well, but I think for Turkey Day I'll use a sharper angle.

Really, this bread was so simple I might make it in addition to my other breads for Thanksgiving. All I can say is that there is not going to be a lack of bread at this Thanksgiving Feast!

Ingredients

3 c bread flour
3/4 t salt
1 1/2 T sugar
dried rosemary to taste
1 c warm water
1 package yeast
2 T extra virgin olive oil

Mix the yeast into the warm water and rest until bubbly, about 5 minutes. Meanwhile, blend the dry ingredients in a bowl. Add the yeast mixture and the olive oil and stir until dough forms into a ball.

Turn out and knead until the bread passes the windowpane test, roughly 10 minutes. Form into a ball and place in a lightly oiled bowl. Cover with plastic wrap and rise until doubled, about 1 hour.

Form the dough into the shape of your choice. If the dough is resistant, let it rest for 10 minutes, then continue.

Rise again, about another hour.

Preheat the oven to 400. Bake for 8 minutes, then reduce heat to 375 and finish baking. Times will vary according to the shape of your loaf. The wreath, a thin shape, cooked in 18 minutes while a thicker shape will take closer to 30.

November 15, 2009

Pumpkin Cheesecake

I have never before in my life made cheesecake. Of course, this is probably because I despised cheesecake up until about a month ago. Now I am of mixed feelings, but willing to experiment with it. I found this recipe at Pinch My Salt and decided that it would be a great way to use up some of my vast amounts of pumpkin and to welcome The Husband home next week. However, I had heard from friends that cheesecake can be tricksy, so I decided to do a test run yesterday. I don't have a mini cheesecake pan, but I did recently acquire a small springform pan, so off I went on the cheesecake attempt!

Ingredients

1 c graham cracker crumbs
2 T brown sugar
1/2 t cinnamon
1/8 t nutmeg
2 T melted butter
1 T maple syrup

4 oz cream cheese
4 oz mascarpone
1/2 c canned pumpkin
1 egg plus 1 egg white, slightly beaten
1/4 c packed brown sugar
2 T maple syrup
1/2 t cinnamon
1/4 t ground ginger
1/8 t ground nutmeg
1/8 t of ground cloves

1 c heavy cream
3 T powdered sugar
1/2 teaspoon vanilla extract
1 teaspoon cinnamon
1/8 t cloves

Preheat the oven to 375. In a shallow bowl, blend the graham cracker, brown sugar, cinnamon and nutmeg together. Using your fingers (I know, messy!) stir in the butter and syrup. Press this mixture firmly into the bottom of your pan.

In a larger bowl, mix the next 10 ingredients. Do not over mix - stop once everything is blended together. Pour this into the pan and bake for 30-45 minutes. Cheesecake is done when the center still jiggles.

Cool 20 minutes, then chill overnight.

Before serving, whip the remaining ingredients together for a delicious topping.

November 2, 2009

Teriyaki Spaghetti Squash


This is Sam.

Sam is a spaghetti squash.

Here you will learn how to make Sam taste delicious.


First, you must poke lots of holes into him. Then, in an oven preheated to 400, bake him for 1h15, or until a fork goes in easily.


Then, you need to cut Sam in half, but you should probably let him cool first. Spoon out the middle bits and the seeds. Then, using a spoon, scrape out the delicious spaghetti guts. Refrigerate any unused parts.


Now, for stir-fry deliciousness, saute your veggies in teriyaki and olive oil. Once they are cooked, toss the spaghetti in teriyaki or sauce of your choice. Remember, you're just heating up the squash, not cooking it. Be careful not to dry it out!

Sam the Spaghetti Sqaush is gluten free! This meal can easily be vegan and dairy free - or not. The choice is yours!